Links to documentation
IntroHeadset (This is the stuff that holds the handle bars & fork in place)
Bottom Brackets (This is thing that holds the peddles in place)
Hub Bearings and Gears (How to remove the gears & bearings in the rear wheel)
Brakes (How to adjust breaks)
Derailleur / Derailers (How to adjust derailleur or derailers)
Spokes and wheel adjustment (How to adjust bicycle spokes)
Many bearings not in cages
Many bike axles do not have their ball bearings in cages. The ball bearings are just placed in there by themselves without a cage to contain them.You can pick up a single ball bearing by dipping your finger in grease and then touching the bearing. Then take the bearing and insert it into the axle.
Bearing guages
When you lose a ball bearing you have to figure out what size you need to replace it.Ryan said that bearing come in 1/32 of an inch size increments.
They have a bearing gauge that you can use to measure an existing bearing to find out what size it is.
The one Ryan showed us was like a foot long rulers. But the edges are not used to measure the ball bearings.
In the center of the rulers were a bunch of holes and you shoved the bearing thru a bunch of holes till you find the smallest hole it will fit thru.
The bike I worked on last night was using 1/4 inch bearings.
Rear gears are interchangeable
I was kind of surprised but all the gears on the rear wheels are interchangeable.The bike we worked on had the freewheeling gear on the front instead of the rear.
We took the gear from the rear wheel and threw it away and replaced it with a gear we found on another wheel.
Remember the gears are ALL interchangeable.
Two styles of rear gears
There are two different styles of rear gears and they are taken apart slightly different. It is too hard for me to describe the differences here. Mainly because I don't remember. But basically once you start playing with them they are both easy to remove from the axle.The main reason to remove the gears from the rear axles is so you can replace the bearings on the rear axle.
Both type of gears have the same basic type of hex socket to remove the gear with. But one gear uses a 2nd wrench that has a chain on it and looks like a plumbing wrench to twist pipes with. A monkey wrench with a chain on it.
You don't rebuild the rear gears
I thought we were going to take apart a rear gear and rebuild it. But Ryan said that they are a pain in the butt to rebuild and you usually just throw then away when they stop working and replace them with a new set of gears.He did say they do have special tools to allow you to do that, but they don't do it here.
Adjusting breaks
Tightening break levers or handles
We had an older racing bike. To mount or unmount the break levers or handles you had to stick a screw driver into the break handle and tighten or untighten a C clamp screw.To me it wasn't obvious where the screw to tighten was and the Chuck guy showed me.
Dumb me was going to adjust a nut on the outside that would not have done the job.
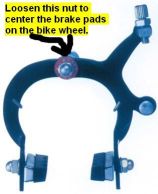
Mounting brackets and springs
The stuff that holds the mounting brackets on is not adjustable for the most part.The nut on the back of the mount is only used to help you center the brake pads on the wheel. That's it.
These are the type of brakes that have both shoes attached together in one peace.
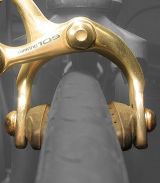
Newer brakes springs
The nuts on the spring loaded things are only there to control the tension of the springs. Same for those three holes.To adjust the brakes do this.
Loosen or maybe tighten all the adjustments nuts and screws so the break pads are fully on or the brakes are fulling locked in the brake position.It should look like this, with the brake pads touching the wheel rims.
Now adjust the break pads so they are centered. on both sides of the rim. For the older breaks we had this meant adjusting the nut on the break assemblies.
Also adjust the break pads they they hit the rim correctly.
When that is done you loosen the break cable so that the breaks are no longer on tight and bingo the break adjustment is done.
It is pretty easy doing it that way.
Tools
They showed us two tools. One was called the "third hand" and the other one was called the "fourth hand".The "third hand" was a tool that allowed you to force the brake pads to the fully braked position.
You just put it on the brake and it holds the break in a locked position on the wheel.
From there you could adjust the break pads.
The "fourth hand" was a tool that had two parts.
The first part of the "fourth hand" tool grabbed the break cable.
The 2nd part of the "fourth hand" too then stretched the brake cable while the the first part of the "fourth hand" tool was holding the wire. This allows you to tighten the break cable with one hand.
Useless information
While the other bike parts seem to be fairly standardized with just a few standard parts fitting all models of bikes it ain't that way with breaks.There are all kinds of different breaks for each brand of bike.
Derailleur / Derailers
Bike Chains
Most 10 speed bikes do not have master links on the chain because the master link interferes with the derailer.The showed us a couple of tools to remove any link on the chain which you need to do you you want to remove the chain.
Worn out chains and gears
Over time your chain "stretches". It really doesn't stretch, but it appears to get longer because the pins that hold the links together get worn and the chain become longer.Also at the same time the gears on the front and back also become worn.
The teeth on the gears start out as squares, but as they get work look like sharks teeth and become very sharp.
Worn out chains and gears is not a problem if they become worn out together. They become mated to each other
The problem is when you mix a worn chain or worn gear, with an unworn chain or unworn gear.
That sometimes causes the problem where the pedal seems to be slipping.
Some people like me don't change gears and the chain become worn and only the gear that you always use becomes worn.
This will cause problems only when you shift and start using a gear you don't normally use.
You determine if a chain is worn by measuring it.
They showed us one tool to measure the chain and determine if it is worn.
A better way is to measure the hold chain to see if it it is too long.
Measure the chain, divide the measurement by the number of link in the chain and that will tell you if it is worn.
I think they said most chain links are 1 inch.
Adjusting the derailleur or derailer
Both the rear and front derailleur have two adjustment screws on them.They are limiting screws.
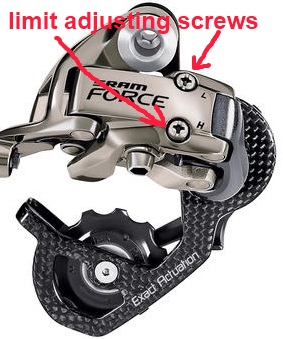
One screw limits the direction the derailleur can move the chain in the direction of the smallest gear.
You want to allow the derailleur to move the chain to the smallest gear, but not past it.
When you adjust the derailleur for the smallest diameter gear remove the wire cable that moves the derailleur.
Then allow the derailleur to move to the smallest gear but not any farther.
The other screw limits the direction the derailleur can move the chain in the direction of the largest diameter gear.
You want to allow the derailleur to move the chain to the largest gear, but not past it.
If the derailleur move the chain past the largest gear into the wheel it can cause major problems.
The wheel can lock up. But since it is the rear wheel it probably won't throw you off the bike like it did to me when the front wheel on my bike locked up.
The chain can rip spokes from the rear wheel.
When you adjust the derailleur for the largest gear you DON'T remove the wire cable that moves the derailleur like you did when adjusting the smallest gear
Then allow the derailleur to move to the largest diameter gear but not any farther.
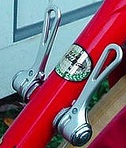
Adjusting the shifting levers
The older levers used to shift gears are called friction levers. They just move and don't have any notches for any specific gear. (Ryan didn't says it, but I think any levers like this, such as the levers used to quickly release your wheels are called "friction levers")
They are easiest to use or perhaps better said easiest to adjust because you don't have to adjust them.
The newer shifting levers and things have a notch or slot for each gear.
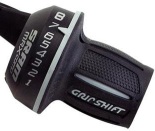
They are a pain in the butt because you have to adjust them so that each notch adjusts the chain correctly for that gear.
I left early and didn't hear how to do that task.
Ryan says he likes the older friction shifting levers because they are simpler to use and more important because you don't have to adjust them.
Tightening Spokes
Adjusting or truing wheels, or wheel alignment
I didn't know it but there are TWO sets of adjustments that you have to make on a wheel or rim when you adjust the spokes.Lateral or sideways adjustment
The first which I knew about is adjusting the lateral or sideways bend of the wheels.
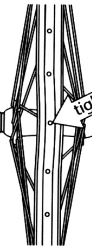
Basically this makes sure the wheel does not wobble to the right or left as you ride you bike. The wheel should be a perfectly straight up and down, and not have parts of it bent.
You don't need to remove the tire from the rim to make this adjustment.
With this adjustment parts of the wheel bend either to the right or left and you attempt to pull all these parts of the wheel that are leaning to the right or left so that they are perfectly centered.
With this adjustment you tweek the main spoke with 1/4 of a turn at a time and the two spokes next to it with 1/8 turn adjustment.
Ryan says to do it right you should turn it slightly more the 1/4 or 1/8 of a turn and then back it off to 1/4 or 1/8 of a turn.
That will releave stress in the spokes and wheel.
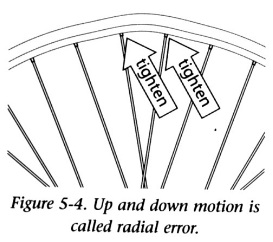
Radial or roundness adjustment
The second which I didn't know about is adjusting wheel so it is perfectly round or in a perfect circle on the outside. I believe this is called a radial adjustment or an up and down adjustment.
When you make this adjustment, you need to remove the tire from the rim.
With this adjustment parts of the wheel have slightly different diameters and you attempt to make every single part of the wheel have the same diameter so it is perfectly round.
This adjustment moves the spokes a much larger distance then adjusting them lateral or sideways.
So instead of using the 1/4 and 1/8 turn for lateral adjustments you instead use 1/2 turn and 1/4 turn for radial adjustments.
Again Ryan says to do it right you should turn it slightly more the 1/2 or 1/4 of a turn and then back it off to 1/2 or 1/4 of a turn.
Again that will releave stress in the spokes and wheel.
Releaving stress in the wheel
You don't have to do this, but if you do it before adjusting the spokes it will releave the stress in the spokes and make the adjustment easier.Grab the wheel by the rim on the out side and press it on the ground.
You should hear a few spokes tweek and snap, which is the stress in the spokes being removed.
Then flip the wheel over and do the same thing.
Oil the spoke nuts or thingies
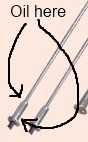 It won't hurt to squirt a tiny drop of oil on the
threads of the nuts that are used to hold the spokes to the rim.
It won't hurt to squirt a tiny drop of oil on the
threads of the nuts that are used to hold the spokes to the rim.
Also squirt a tiny drop of oil at the base of the spoke nuts which are attached to the rim. That will make them spin easier.
Adding new spokes - some pointers
The spokes flip flop in the direction they are attached to the where. One spoke points out, the next spoke points in.Before adding a new spoke to the rim figure out which direction it should be inserted from. Like I said the first spoke is inserted one way, and the next spoke is inserted the opposite way.
The spokes overlap each other and the overlap changes on a symmetrical basis.
Again after you have inserted the spoke next to the axle, before you put the other side of the spoke in the top of the rim make sure that the spoke overlaps the other spoke in the same pattern that the existing spokes overlap.
Rear wheel vs front wheel
The spokes on the front wheel are identical on both the right and left side of the wheel.That makes perfect sense!!!!
The spokes on the rear wheel are NOT identical on both the sides of the wheel.
The spokes on the side of the wheel with the gears or cassette are slightly shorter and looser then the spokes are on the side of the wheel without the gear.
I can't remember exactly what Ryan said on this but the reason is because the wheel or tire on the outside must be perfectly centered for the brakes to work.
But on the inside of the wheel by the axle the gears take up space that isn't on the front wheel so in short the spokes on the gear side of the wheel will be shorter and looser then the spokes on the non gear side of the wheel.
My Invention - Dec 12, 2011
I added a LED light to the spoke machine to tell when the machine has made contact and the rim is rubbing on the spoke adjustment machine.Seeing a LED is sometimes a lot easier then listening for the rubbing sound. In the class I was having trouble making the adjustment by listening for the sound of the rubbing wheel so a LED makes it possible to adjust the wheel by looking at the LED, instead of listening for the sound.
To get real fancy also I also added a buzzer so that it buzzes when the machine has found that the wheel is rubbing the machine.